Showing posts with label hand made tools. Show all posts

Wednesday, February 23, 2022

Old Mallet Restoration


This old wooden mallet may have been hand-made, or it may have been purchased. I didn't see any maker's marks on it, I think it was hand-made. Its got a nice size and weight to it, maybe 50% bigger than the wood mallet I made for myself a few years ago, so I think it will be handy to have around the shop. The handle fits into the head in a tapered hole, so the harder you swing it, the tighter the head gets, yet and easy tap is all it takes to loosen the head up. Between the two parts, the handles is probably slightly more complicated, so making a new head would have been pretty easy, but i wanted ti try and keep as much of it as I could.


So I planed off the big break at the top of the head, and matched it to a piece of white oak I had in the shop. After the glue set up I trimmed it on the band saw, and then took it down to rough shape in the vise with a hand plane. I finished up the shaping on the power sander, and then went over it with files and sandpaper to get the shape right. I didn't want to try and chuck this up in the lathe, so doing it this way was a little fussy, but the results were good.


After I got it shaped up I scribed the detail lines in with a marking knife, and then deepened them by running a thin wire in the slot. The final step was to clean the wood with grain alcohol and a utility knife blade, and then coat the wood with raw linseed oil.


You can see a video I made of this build on YouTube.


Sunday, February 6, 2022

Scratch Stock


I have an old fireplace surround I'm working on for my sister and her husband. They've bought a gas fireplace that they'd like to install in their living room. The shape of the gas fireplace doesn't match the opening in the surround they found so I'll modify it to suit, and add some shelving along with some other elements to tie it into their living room (see below.) *


My son and I used a heat gun to strip most of the paint off the most complex parts we're reusing, the small columns. They have appliques on them but that section of the column will be removed to lower the height, leaving the lower fluted section, and there is still paint in the flutes. That's why I need a scraper. I could just round off the end of a piece of tool steel and use it like a paint scraper, but holding it firmly, and close to the wood surface will give me more control. At least that is my hope, so I'm working on making a simple scratch stock.

I found some great sites that really helped with the design and build of this tool. This article from Woodsmith Magazine is a great introduction to the basics and includes plans. For more of a deep dive into the types and styles of scratch stocks and their history, check out the Valley Woodworker blog. Fine Woodworking has a helpful article with an embedded video which is also helpful. Thanks to  these sources for the great information. 

Click to enlarge


I made a video of this tool build and posted it on my YouTube channel, check out the video here. I'll save the scratch stockfence for a later date, as I don't need it for this project. The cutter head is half-round and its designed to get into the flutes on the columns without damaging the wood. The cutter blade is made from a used utility knife blade, so between the scrap wood and the used blade, this project has basically no cost for materials. And the cutter head can be shaped on both sides, but I haven't done that yet.

The completed scratch stock

Leave a comment if you think the Sketchup model would be useful and I'll post it.

Here's the surround I'm building*

* Hopefully I'll get a chance to record some of that work and post it here and on my YouTube channel.

Sunday, October 17, 2021

Compass Saw Tote Design

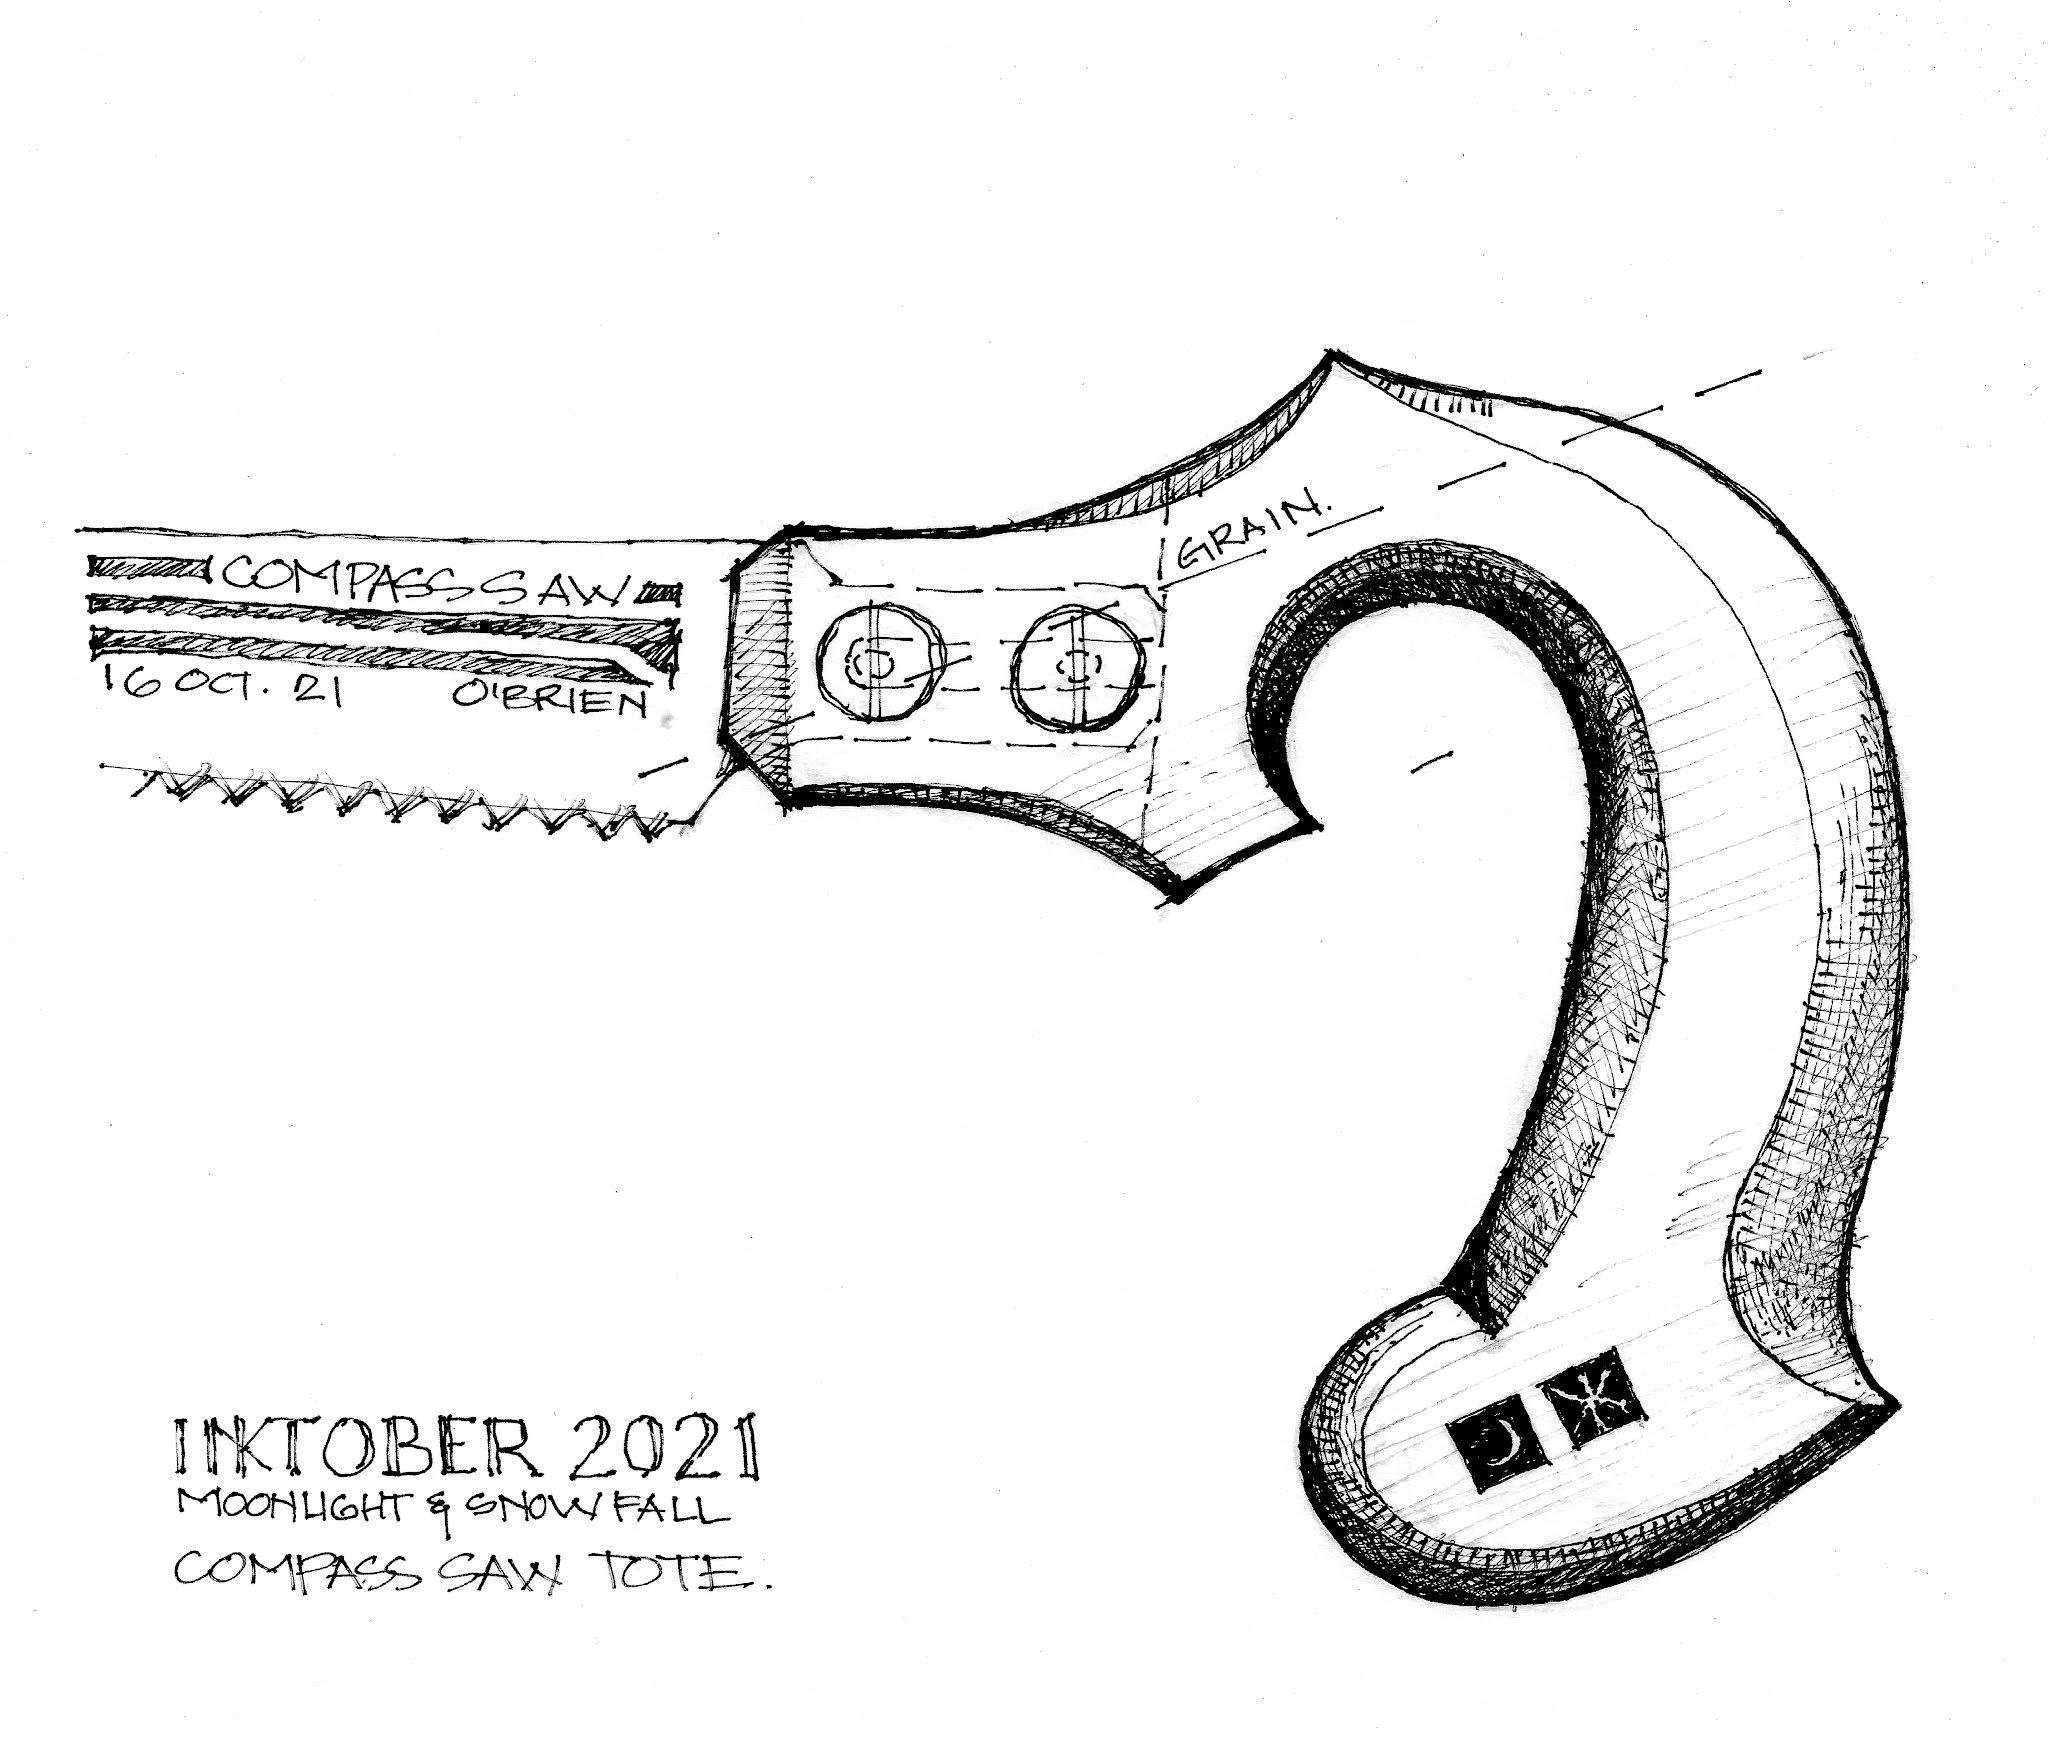
I've been doing drawings once a day for the month of October this year for the Inktober Inking challenge, and the prompt for yesterday was Compass. Rather than drawing of a wayfinding compass, or a drafting compass, I decided to put down an idea for a new tote design for a compass saw.

Traditional handsaws, and backsaws have always had handsome totes, but compass saws have suffered a little in the design area. I think that is based on the needs of the user, and the way the saw is often used, either upside down, or sideways, with three fingers on the handle and the forefinger along side the cheek, or with four fingers in and a thumb on top. In practice, this has led to a simple hook shape with no horns to get in the way of turning the saw, or changes in grip, but I'm hoping for a tote design that allows for both.


My design takes obvious clues from traditional compass saw tote designs like those from Jackson and Disston, and others but I've tried to add just a little more detail to keep the tote from being so drab. Some larger versions or table saws will often have horns to and bottom, similar to a backsaw, but may not be as flexible for different grips as the hornless design.

A quick ebay search today resulted in a few examples:

Disston Compass Tote

Tyzack Compass Tote

'Vintage' so I'm not sure who the maker is

William Webster, Shefield Compass Tote

Is my Compass tote design a big difference? No, but that's not the point. The point is to add back a little of the detail that makes the horned tote on the Webster, without loosing the flexibility of the simpler, 'pistol-grip' styles.

Next up is to do a test.

Saturday, July 14, 2018

Saw Tote Designing

I got a comment on one of the (very few) YouTube videos I've posted. That video is about a saw I built for a customer of my Etsy store. In the video I must have mentioned that I put together the tote design myself and the commentor suggested that what I had really done was just downloaded a tote design and made a few modifications. My response is, essentially, 'that's exactly right.'


Table saw tote design underlays set to transparent

In fact, I downloaded a bunch of saw tote designs, both drawings and photos, and worked with them all, plus what I had, to develop a tote that would work for this saw but still had that classic tote design. My first tote design was a few years ago, and while I was happy with it at the time, when I look back I can see a number of mistakes, that I've tried to improve upon moving forward. Why try to reinvent the wheel when we can all stand on the broad shoulders of those that came before us? And if you ask the guys who have made their tote designs available for download, I think they'll say the same thing. Their designs come from traditional saw makers too. (The TGIAG drawing included in the underlays above is labeled as a Disston No. 9, very similar to the No. 12) Still, the clean geometry of the drawings these guys make available for download make them even easier than photos to work with. My thanks (again) to Two Guys in a Garage, and Blackburn Tools for making them available.


Above is the design I put together (in red) for the 6 inch backsaw in the YouTube video, overlaid on a pistol grip tote design from Blackburn, which is one of the designs I used for reference, mostly for the grip. The design of the grip, including the relative positions of the 4 circles that make up the inside and outside portions of the grip at the top and bottom is critical for a comfortable tote design, and these relative positions change with hand size, as well as angle of attack. And you can see that I had to adjust the angle of attack on this tote considerably given the short plate length of this saw. Other changes include heavier horns to prevent breaks, elimination of the hook, more mass in the cheeks, lining up the saw bolts, and a few other minor stylistic changes. In the YouTube video about this saw build, you can also see that I added length to the horns, and combined the double top nib into a single nib.

The completed Table Saw tote design, with a nod to its Disston No. 12 origins

Above is my most recent tote design.* This is the design that resulted from all of the underlays shown in the first image at the top of this post. Its for a table saw, or pruning saw. I'm using Vectorworks for the CAD drawing. I found a nice old Disston No. 12 in the basement of my brother-in-law's family home. He thinks it may have belonged to his grandfather. Only half of the tote was there, it was rusted, and it had been sharpened so many times that the plate was nearly gone. You've seen those saws that come to a point at the end like a crazy keyhole saw. (You can see the plate in the top photo, which I used to lay out the holes in the tote design.) So I decided to cut it down and make a short hand saw for breaking down pine boards and other light duty stuff. Once I squared off the cutting edge, and trimmed the toe, the fourth tote hole was too close to the teeth, so I decided to remove it. (You can see the hole drawn in the final design, above. Its just outside the cut line of the new heel design on the plate.)


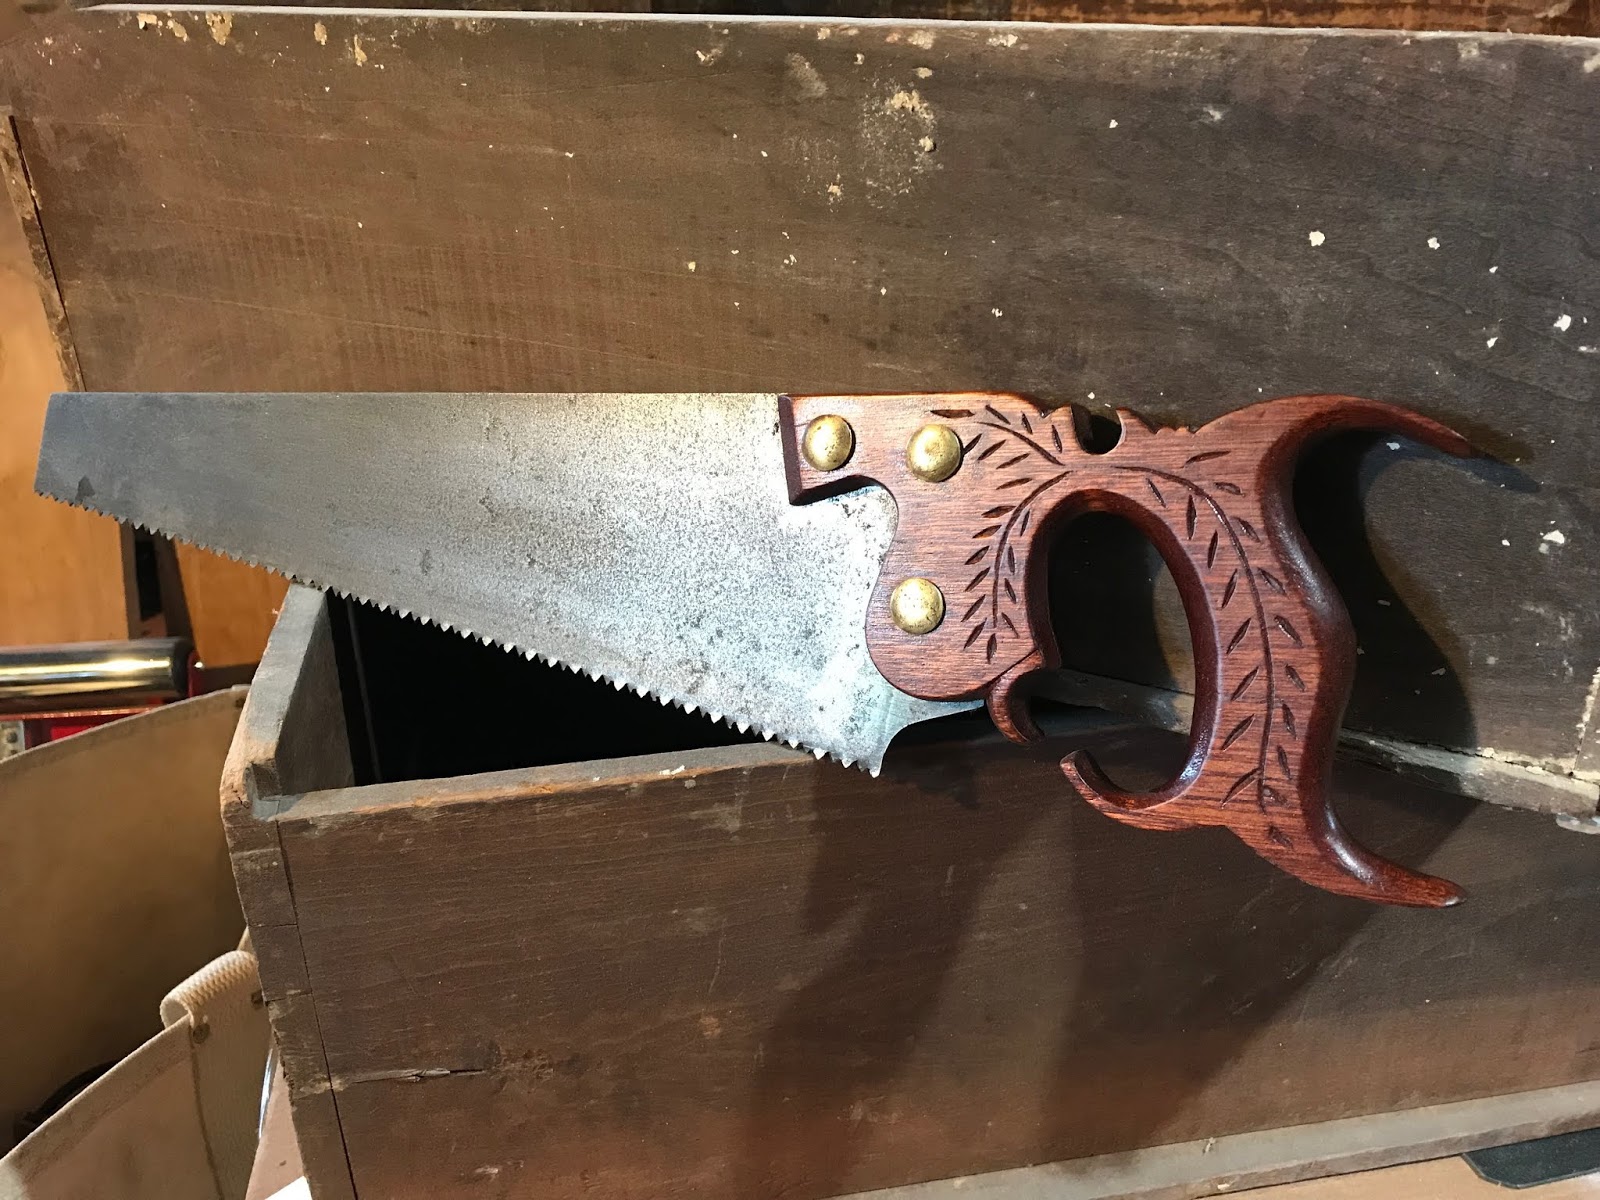
Here's how it turned out. I wanted a pistol grip for this little saw--I think its about 14 inches long--but I wanted to recall the extra loop in the grip of the Disson No. 12, so I opted for a little remnant. I cut new teeth for crosscut at 7 PPI, so its a little bear when chopping through softwood. The wheat design chip carving and the salvaged saw bolts are also a nod to the saw's history, but I gave up on trying to use a medallion; the cheek design just got too goofy looking when I made it large enough to fit the medallion.


It was a fun little saw to make, and it fits in a tool box, and I can throw it in a bag with the other tools when I'm working around the house and not worry about it getting beat up a little.


* If you think any of these tote designs might be useful for one of your own projects, please feel free to download. If you need a pdf, leave me a comment with your contact and I'm happy to send what you need or see if I can post it.


Wednesday, June 14, 2017

kiridashi

Kiridashi have an interesting history; they go way back. A quick search online uncovered one source * that traces Kiridashi and Ko knives to approximately 20,000 years ago, in Japan. These stone knives are described as using the Setouchi technique; ** making a flat stone core, which is then struck on the side to create a wide, flat flake knife, which is then retouched to create the distinctive, long, pointed knife with a cutting edge near the tip.

At some point between then and now--lets say after 500 BCE, when the iron age came to Japan--kiridashi began to be made from iron, and eventually steel. The design of the traditional steel kiridashi is appealing in its simplicity: a piece of flat stock is beveled to a point at one end, and then sharpened on one face to a keen, chisel like edge.

Kiridashi make great marking knives for woodworking--and is what they are still used for in Japan--because the flat, unsharpened edge lays tight against your straight edge or try square, taking the guess work out of where the cutting edge is relative to the straight edge you're trying to follow.

These knives can be made with simple handles, even paracord wraps, but I prefer the simple piece of steel with a sharp edge. I've seen them forged and sharpened, and ground from hardened steel, on websites and YouTube, but what caught my eye was reusing an old file. There are some great tools made from old files, and I wanted to give it a go.

A quick look around the shop this past weekend gave me two options, and both were older Nicholson files that were still in good shape, and then I found an old triangular file with the tang broken off. I almost dismissed it immediately but picked it up because it seemed to be the right length. The three sided file fell right into the sweet spot in my grip, and I knew I needed to try it.

This file is an old Simon, 8-inch regular taper (four square) single cut file, that was a little nicked up. The missing tang just made the grinding that much easier.


I ground the cutting edge on the bench grinder and I tried to align the cutting edge with the cut lines on the file (for looks.) 


I ground away the back at a steep angle, similar to a chisel, but I didn't measure it.


The triangular shape fits great in the hand for cutting.


I finished the sharpening with 220 and 320 grit sandpaper on a sheet of glass. The cutting edge is sharp, keen and strong. I cut a few test lines in some well seasoned oak I have in the shop, and the marks are nice and clean. I think I'm going to enjoy working with this marking knife.


* "History of Humanity: Prehistory and the Beginnings of Civilization," edited by Sigfried J. de Laet: Unesco, Paris: 1994

** "Archaeology of East Asia: The Rise of Civilization in China," Korea and Japan: Oxbow Books, Oxford: 2015

Wednesday, June 22, 2016

Saw Bench with Tool Storage

I don't have a whole lot of room in my shop for a saw bench, but I have been missing something to lay a board on to saw, as well as something to sit on while I do some busywork. I've looked at a bunch of designs for saw benches from the traditional (looks like a fancy saw horse) to the split top rigid type that I assume are great for ripping with a hand saw. I think ripping is great, but I have a table saw, and I haven't reached the point where I've become a hand tool user, exclusively.
Click to enlarge, send me a note if you want the plans

So my saw bench starts with some pretty simple ideas, e.g., keep the sides and ends square to the top to act as a guide, make it at a comfortable height for sawing and sitting, and don't get too carried away with the design and construction. I think the saw bench I've come up with will last and when its time to break it down and build a new one, its should be pretty easy.

I was going to hinge the top, but then I figured why not just set it in there? So my design shows a rabbet all the way around so the top--1 1/2-inch thick stock--can drop right into the opening. I figure that will help stiffen the whole assembly when I'm sawing and sitting, and the two scoops cut out in the faces allow me to pull the top off when I need to get to the storage inside.

The two ends are also 1 1/2-inch thick stock, and the faces and bottom are 1x stock. I've let in the two sides so the face are flat down to the floor, and there are dadoes in the two ends to support the bottom. The two sides dip down in the middle so I can add nailing strips to support the bottom, and I have one stretcher running across, to also add support to the bottom and keep the sides from blowing out. I thought about doing a through tenon on the center stretcher, but I ended up doing a mortise about halfway through. The drawing shows solid pieces for the side panels and the bottom, but I'm making them out of some older stock that I'm piecing together.

More to come!


Tuesday, August 11, 2015

Moxon Vice

My shop is growing like I think many shops on a budget grow: slowly, and as needed. The things I don't have, could easy furnish a very nice shop on their own. One of those things I don't have is a nice bench. Oh I know, its supposed to be first on the list, but the thing is, I do have a workbench, sort of.

It started out as homemade staging planks when I was fixing my house just after moving in. The planks I made are 10-feet long, and just over 2-feet wide, with 2x4 framing and 3/4-inch plywood tops. I set these on post jack staging and they were much sturdier than 2x12s. A few years later, I added some legs, some stretchers, some plywood scraps on the ends and across the stretchers and that is my bench.

Not very glamorous.

But I've mounted my grinder at the end, and then my drill press. So now its crowded too. But the wedge vice I had on there for a few years had some obvious limitations. I don't have a hundred bucks for a bench vise, and I've seen some nice Moxon vices on YouTube, and elsewhere on the internet and thought that a variation of that would work for me.

Moxon vices are typically a benchtop affair, set atop the bench and held in place with some clamps of hold fasts, and set so that the rear chop or jaw of the vice is flush with the front of the bench. This assumes you don't need it often enough to mount it, and because its raised above the surface of the bench, the height is more convenient for fine work like dovetailing, so you don't have to bend over.

My idea was to use it as a bench vice, set flush with the top of the bench, and add dog holes so I can also use it to hold items on the surface of the bench. So my Moxon is more of a hybrid between a Moxon and a double-screw bench vice.

Designing my vice started by thinking about it. I liked the idea of the heavy wheels that I saw on the nicer Moxon vices, they were weighty and you could give them a good spin and they'd tighten right up. But I also liked the wooden screws because they're bigger, and the edges of the threads aren't sharp like a lot of threaded rod is, so it doesn't cut into your work. Then it occurred to me: I've seen something like this before, when I was younger and used to lift weights.
After looking at the options, I was happy to see that there is a built in shoulder at the end of the thread to act as a stop for the rear chop, and they have these heavy steel floriform nuts* that take the place of the cast iron hand wheels in the fancy kits. And, they're threaded on both ends so I could cut one in half and $20 would give me enough for two vices! So wow, right? But the threads are little short, and if I'm going to make chops out of 6/4 or 8/4 hardwood, I'm no going to get much of a range with these things from they way they look, and there aren't any good dimensions on how long those threads are on the various places I looked online. So it was off to the store to see if I could find the dumbbell handles with the longest threads, and what do I find? This crazy thing:

Golds Gym 5-foot Weight Lifting Bar


Its a weightlifting bar that comes in three pieces. The two ends are solid, 1-inch diameter solid steel, threaded, with an integral stop like the dumbbell handles, The center piece is a hollow pipe, that slips over the end bars, and is fixed in place with set screws or something. Seems like a crummy idea for a weightlifting bar, but great for a vice! The threads are like 10-inches! This bar was about $25 at Walmart (corrected).

There are 3 of these with holes lined up. 2 under, and 1 in front of the bench.

So, I came up with a simple design to hold the threaded rods in place, so I can install this under my bench, and feed it through corresponding holes in the 2x4 holding up the front edge of the bench. Its a few pieces of 3/4-inch plywood, with holes large enough to allow the rods to slide in and out, but small enough to catch the raised stop at the end of the threads, and two side pieces of plywood  to hold them together makes a rectangular frame. [Let me know if you'd like to see a SketchUp model]

The completed Moxon vice with board clamped in place

I assembled the plywood frame, with the two threaded rods inserted. They don't fall out because the raised stops hold them in. There are corresponding holes in the front of the bench, so I slipped it in from below, and screwed the frame in place to the bench skirts. Then, with the two rods sicking out of the bench front, I slipped over the last piece of plywood, with holes aligned, and then the 8/4 white oak front chop and the nuts. Basically done.


BONUS: The rods slide back, out of the way, when not in use.

A couple of items to note: The rods slide in and out in the frame, so when the vice is not in use, I can spin the nuts out to ends, and then slide the rods away so I don't walk into them. The 8/4 chop is about 4-inches deep so I get an 1 1/2-inches or so of grip above the rods. Since I finished, I've added a couple of dog holes to the chop so I can use it to clamp work onto the surface of the bench too. Lastly, I made a 'wrench' out of pine that has a matching corrugated (floriform, right?) hole that fits over the spin nuts, and a short handle so I can torque the nuts tight.

I'm thinking about making some hand wheels out of heavy hardwood with the floriform shaped routed out, so they'll slip over the spin nuts. If I do, and they work, I may glue them on there (and I'll post it here.)


* floriform = flower shaped. The dumbbell folks call them threaded collars, spin collars, or star collars. They look more like flowers to me.


Wednesday, March 26, 2014

Bench Hook

As part of my reconnecting with hand tools I made myself a bench hook. It's almost too simple to be worth talking about, but that's where the beauty of this gizmo shines: it's so simple, but really handy. If I had to think about it, I'd say that you could probably boil down the worth of a homemade tool as a ratio of how useful it is, over the value of its manufacture in time and resources. The equation looks like this:

V = U/{T + r + wt}


Nah, I'm just kidding. I made that equation up, but I'm serious about value. There are guys out there building table saws and joiner from scratch out of wood and swimming pool parts. Honestly, these projects are fascinating but I'm not sure their usefulness balances with the time and effort that's put into them. I'm sure there are better examples, and I also understand that there are other, less quantifiable, benefits to these efforts (such as enjoyment and learning potential) but for me, some things are just more efficient to purchase.


The bench hook, by comparison, is NOT something that anyone should buy. It is easily made with scrap wood in about 5 minutes and makes all kinds of things easier. Especially when you don't have a vise! With a little more effort you can square it up nice, and even add a 45-miter on one side and you can use it as a quick miter box for things that don't need to be dead on, just run the saw blade along the edge of the base and the end of the fence.


The design is simple: a rectangle of wood or plywood, with a stop or fence attached to either end, on opposite sides. One stop hooks onto the edge of the bench, the other is used to trap your work against. Easy. And when it wears out, you make a new one. You can even reuse the scrap for something else.

Final analysis: make one today.

Tuesday, March 18, 2014

Wedge Vise

I have a machinist's vise, which works great, and I've recently made a set of wood jaws for it--maybe I'll point them out in a future post--so I can get by, but what I really needed was a bench vise to hold stock in place for planing, chisel work, etc. so I made this simple wedge vise. Actually, I made two, you can see the smaller, vertical wedge vise mounted to the face of the bench for clamping boards vertically. In the first image, you can see that I have small board tapped into the vise on edge, but an even better idea, would be a third type of wedge vise for working the edges, as shown in this Rockler article.


The draw backs of this system is lack of flexibility. The size of wood these units can handle is based on how far apart the jaws of the vise are set. I tried to pick a size that works for me, but I still end up blocking the vise with scraps to make up the difference in wood sizes.


Using the vise is simple. The stock is placed flat on the bench, with one end against the fixed jaw, and then the wedge is tapped in place with a wooden mallet. To release, just tap on the other end. Once a piece is in the vise, the whole bench will move when the clamped stock is shaken, so it really holds.


I made my vise out of 5/4 pine scrap. The long angle is 15-degrees, if I remember correctly, and its back-cut at 30 to 35-degrees, so that when you tap the wedge in place, it dives in under the fixed jaw and won't work loose. I cut the mated pieces out of one scrap on my compound miter saw, and then just screwed the fixed jaws to the bench. As you can see, my bench is 3/4-inch plywood sheathing on a frame of old 2x framing lumber, so I can beat on it (and screw things to it!)

This system won't take the place of a nice bench vise and some bench dogs, but until the time I get something like that, this is what I'll stick with. Since I took these photos, I've added a few bench dogs to help with clamping different sized pieces, including a set that runs perpendicular, so that I can drop in a scrap, and use the vise for edge work as I mentioned above. So far, so good!


Friday, March 14, 2014

Marking Gauge

So I've been really interested in hand tools recently, but not just hand tools; old school hand tools. It a back-to-basics feeling that's behind it and I like the fact the I'm more closely connected to the work. Not that I'm not connected with power tools is there a joke in there somewhere? its just that all that high speed and high power which works so well, has safety precautions that necessarily separate me from the work, so the work doesn't separate me from my fingers.

That, and its really satisfying to use a smoothing plane to square up a piece of stock that came out of a log 20 minutes ago.

This particular project however has very little of the lately of the log caste, just the birch wedges in the beam and the fence; the former holds the scribing blade in place, and the latter fixes the beam within the fence body. I'm a big fan of wedges.

So this is my first marking gauge, but I don't think it will be my last. I've never owned a marking gauge so just getting used to using it is fun. I've used a sharp knife to mark my work I'm actually working on a marking knife now but the gauge does things the knife and a straight edge can't do, and it does some of the same things, only better.

Long straight marks, parallel to the edge of a board: marking gauge. Square lines across the end of a board a set distance off the end: you could do it with a square and a marking knife but boy is it easy with a marking gauge.


Scrap wood marking gauge
 The fence is mahogany, and the beam is some hard-as-a-rock mystery wood from a pallet I have, and the two wedges are birch, as I mentioned.


The design of the beam is rounded on the bottom, so that when the wedge which runs over the top of of the beam is tightened, the beam is pushed down into the rounded mortise. This keeps the beam from wiggling left to right, as opposed to just top to bottom, which is what a wedge may do if the beam was rectangular. This basic idea I got from Sumokun over at YouTube. Sumokun does some beautiful woodcraft with not a lot of space and no fancy tools. He says it comes from a Popular Woodworking design, based on an old French design. Thanks Sumokun.

I made some additional modifications: I wedged the scoring blade, rather than setting it into the end of the beam with a screw, and I set in a brass plate on the face, to keep the face from wearing. The wedged blade idea came from Steve Emmons, who says he learned how to make his gauge from a Fine Woodworking article. The rectangular mortise in the Emmons gauge is made by assembling the fence from four pieces, and leaving the mortise as a void space, clamped around the beam to insure a tight fit. If I make another one, I may try that, altho the round bottom (made with a 1/2-inch Forstner bit prior to squaring up the mortise) is a nice feature to leave out. I think a similar feature could be had with a beam--and mortise--that is wedge shaped on the bottom

The gauge broken down to its parts


The scoring blade is made from a jigsaw blade: I ground the teeth off, cut it to length and sharpened the end to a short knife point. You can see the detail of the wedge that holds the beam in place in this photo. The little hook on the end keeps it from falling out when loosening the gauge. In fact, its pretty easy to use the gauge one handed, which is pretty nice--and not possible with the thumb screw type.