Wednesday, February 23, 2022

Old Mallet Restoration


This old wooden mallet may have been hand-made, or it may have been purchased. I didn't see any maker's marks on it, I think it was hand-made. Its got a nice size and weight to it, maybe 50% bigger than the wood mallet I made for myself a few years ago, so I think it will be handy to have around the shop. The handle fits into the head in a tapered hole, so the harder you swing it, the tighter the head gets, yet and easy tap is all it takes to loosen the head up. Between the two parts, the handles is probably slightly more complicated, so making a new head would have been pretty easy, but i wanted ti try and keep as much of it as I could.


So I planed off the big break at the top of the head, and matched it to a piece of white oak I had in the shop. After the glue set up I trimmed it on the band saw, and then took it down to rough shape in the vise with a hand plane. I finished up the shaping on the power sander, and then went over it with files and sandpaper to get the shape right. I didn't want to try and chuck this up in the lathe, so doing it this way was a little fussy, but the results were good.


After I got it shaped up I scribed the detail lines in with a marking knife, and then deepened them by running a thin wire in the slot. The final step was to clean the wood with grain alcohol and a utility knife blade, and then coat the wood with raw linseed oil.


You can see a video I made of this build on YouTube.


Sunday, February 6, 2022

Scratch Stock


I have an old fireplace surround I'm working on for my sister and her husband. They've bought a gas fireplace that they'd like to install in their living room. The shape of the gas fireplace doesn't match the opening in the surround they found so I'll modify it to suit, and add some shelving along with some other elements to tie it into their living room (see below.) *


My son and I used a heat gun to strip most of the paint off the most complex parts we're reusing, the small columns. They have appliques on them but that section of the column will be removed to lower the height, leaving the lower fluted section, and there is still paint in the flutes. That's why I need a scraper. I could just round off the end of a piece of tool steel and use it like a paint scraper, but holding it firmly, and close to the wood surface will give me more control. At least that is my hope, so I'm working on making a simple scratch stock.

I found some great sites that really helped with the design and build of this tool. This article from Woodsmith Magazine is a great introduction to the basics and includes plans. For more of a deep dive into the types and styles of scratch stocks and their history, check out the Valley Woodworker blog. Fine Woodworking has a helpful article with an embedded video which is also helpful. Thanks to  these sources for the great information. 

Click to enlarge


I made a video of this tool build and posted it on my YouTube channel, check out the video here. I'll save the scratch stockfence for a later date, as I don't need it for this project. The cutter head is half-round and its designed to get into the flutes on the columns without damaging the wood. The cutter blade is made from a used utility knife blade, so between the scrap wood and the used blade, this project has basically no cost for materials. And the cutter head can be shaped on both sides, but I haven't done that yet.

The completed scratch stock

Leave a comment if you think the Sketchup model would be useful and I'll post it.

Here's the surround I'm building*

* Hopefully I'll get a chance to record some of that work and post it here and on my YouTube channel.

Sunday, January 30, 2022

Almond Drill Chuck Refurbish


I picked up this small chuck with a bunch of other old tools, and I've had it for a number of years. It was coated with rust but still usable. I've used it in a bit brace and to drill very fine holes just holding in my hand, and twisting it with my fingers. After taking the center out the tail stock in my lathe for the hundredth time, it occurred to me that the taper of this small chuck may be the same. 

Click here to see a YouTube video I made about the refurbish.

After a quick check, I dropped it in Evaporust overnight to clean it up. When it came out of the rust remover, I washed it with a wire brush and hot water. The hot water heats up the metal so that when I'm finished washing and dry the part, the heat dries out the piece really well. 

Here it is in the lathe after I cleaned it
 

I put it in the four jaw chuck in the lathe and  put a clean surface on the tapered arbor. Once it was clean I could see the makers mark on it. Its a T.R. Almond Mfg Co. model 40 - 50 drill chuck. Almond sold these and Morse Taper arbors separately, but the arbor isn't marked, so I'm just assuming that its also and Almond product, as it seems to match the illustration in this catalog page I found on the Internet Archive.

Click to expand, or use the link above

Almond Mfg made this Jacob's style drill chuck at some point after Jacob's brought his invention to Almond in1902 and Almond refused it, saying that it had no significant improvements over his own, hand-tightened chuck. After Almond refused him, Jacob began manufacturing on his own, and patented his invention, and after his key tightened chuck became popular, the T. R. Almond Manufacturing Co., now owned by former company treasurer Carlton A. Hubbel, copied it and was successfully sued by Jacobs for patent infringement. According to the judgement, Almond Mfg could still make their version of Jacobs Chuck, but there were restrictions on where it could be sold. The two companies then feuded over the situation for some time. Most of the information I found on the T. R. Almond Manufacturing Co. and their feud with Jacobs was found on Vintage Machinery's website.

The Morse Taper was invented in 1864 by Stephen A. Morse to easiliy join two rotating machine components. Earlier in the same year, Morse invented the modern twist drill, and with a $30,000 investment from supporters, he opened the Morse Twist Drill and Machine Company in New Bedford, Massachusetts, and soon saw the need for a simple, and easily repeatable method for driving his bits. He came up with the tapered shaft. 

A lot of the information I found on the Morse Taper Arbor history is from the PubMed Central (PMC) site, which is the archive of biomedical and life sciences journal literature at the U.S. National Institutes of Health's National Library of Medicine (NIH/NLM) which talks mostly about how the tapered arbor is still used in medical implants, such as hip replacements.


Saturday, January 15, 2022

ECE Coffin Plane Restoration

ECE Coffin Plane as found in Wells, Maine

The E.C. Emmerich Company was founded in 1852, and  they're still in business in Remscheid, Germany. I found this 7-inch coffin plane at an antique shop in Maine looks like its labeled for sale in the US given that its labeled with both 51mm and 2" dimensions on the iron. I downloaded their catalog, and it doesn't appear that they still offer this plane. This plane doesn't look like it was used very often, but has sat unloved for a while and humidity has lead to rust on the iron, which in turn discolored the wood parts that come in contact with the metal. I've just cleaned it up and put it back to work. 

You can see a YouTube video I made about this restoration here.

There was some spray paint over-spray on the wood, and some general grime. The iron and chip breaker were rusty but not very pitted. There was some limited pitting on the back of the iron where the chip breaker was pressed against the metal. That took a little while to grind out but I don't think the back of the iron was ever flattened, so most of it came while doing that in any case.

Click on the pictures for larger view

I soaked the iron, chip breaker, and screw in Evapo-Rust over night to loosen the rust. While those pieces sat, I worked on the wood parts with a utility knife blade as a scraper, some small files, and sandpaper. I decided not to try and remove the rust stains as that would remove too much wood, and the worse of it is covered by the iron assembly when its put together.

The completed plane

The completed restoration produced a really nice plane. I had to square up the cutting edge and reestablish the bevel, then I worked on it with 400 and 100 grit stones before stropping it on leather with compound. The result was very satisfying. I flattened the sole by hand by marking it with a pencil and using sandpaper on a flat bed (my belt sander with the power off.) I rubbed the wood (except the sole, and the insides) with raw linseed oil.

The tuning of a wooden plane takes a little to get used to but once I had it set, it was taking beautiful shavings from a piece of quarter sawn beech I've had in the shop since 2015.

The wood shined after this pass

Check out the video if you get  chance. Leave a comment here or there (or both places!) and let me know what you think. Do you have a wooden plane, or two? How do you like them compared to metal planes?


Sunday, October 17, 2021

Compass Saw Tote Design

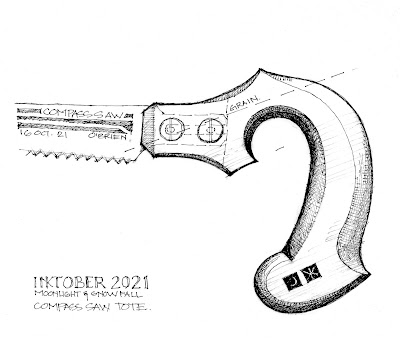
I've been doing drawings once a day for the month of October this year for the Inktober Inking challenge, and the prompt for yesterday was Compass. Rather than drawing of a wayfinding compass, or a drafting compass, I decided to put down an idea for a new tote design for a compass saw.

Traditional handsaws, and backsaws have always had handsome totes, but compass saws have suffered a little in the design area. I think that is based on the needs of the user, and the way the saw is often used, either upside down, or sideways, with three fingers on the handle and the forefinger along side the cheek, or with four fingers in and a thumb on top. In practice, this has led to a simple hook shape with no horns to get in the way of turning the saw, or changes in grip, but I'm hoping for a tote design that allows for both.


My design takes obvious clues from traditional compass saw tote designs like those from Jackson and Disston, and others but I've tried to add just a little more detail to keep the tote from being so drab. Some larger versions or table saws will often have horns to and bottom, similar to a backsaw, but may not be as flexible for different grips as the hornless design.

A quick ebay search today resulted in a few examples:

Disston Compass Tote

Tyzack Compass Tote

'Vintage' so I'm not sure who the maker is

William Webster, Shefield Compass Tote

Is my Compass tote design a big difference? No, but that's not the point. The point is to add back a little of the detail that makes the horned tote on the Webster, without loosing the flexibility of the simpler, 'pistol-grip' styles.

Next up is to do a test.

Saturday, July 14, 2018

Saw Tote Designing

I got a comment on one of the (very few) YouTube videos I've posted. That video is about a saw I built for a customer of my Etsy store. In the video I must have mentioned that I put together the tote design myself and the commentor suggested that what I had really done was just downloaded a tote design and made a few modifications. My response is, essentially, 'that's exactly right.'


Table saw tote design underlays set to transparent

In fact, I downloaded a bunch of saw tote designs, both drawings and photos, and worked with them all, plus what I had, to develop a tote that would work for this saw but still had that classic tote design. My first tote design was a few years ago, and while I was happy with it at the time, when I look back I can see a number of mistakes, that I've tried to improve upon moving forward. Why try to reinvent the wheel when we can all stand on the broad shoulders of those that came before us? And if you ask the guys who have made their tote designs available for download, I think they'll say the same thing. Their designs come from traditional saw makers too. (The TGIAG drawing included in the underlays above is labeled as a Disston No. 9, very similar to the No. 12) Still, the clean geometry of the drawings these guys make available for download make them even easier than photos to work with. My thanks (again) to Two Guys in a Garage, and Blackburn Tools for making them available.


Above is the design I put together (in red) for the 6 inch backsaw in the YouTube video, overlaid on a pistol grip tote design from Blackburn, which is one of the designs I used for reference, mostly for the grip. The design of the grip, including the relative positions of the 4 circles that make up the inside and outside portions of the grip at the top and bottom is critical for a comfortable tote design, and these relative positions change with hand size, as well as angle of attack. And you can see that I had to adjust the angle of attack on this tote considerably given the short plate length of this saw. Other changes include heavier horns to prevent breaks, elimination of the hook, more mass in the cheeks, lining up the saw bolts, and a few other minor stylistic changes. In the YouTube video about this saw build, you can also see that I added length to the horns, and combined the double top nib into a single nib.

The completed Table Saw tote design, with a nod to its Disston No. 12 origins

Above is my most recent tote design.* This is the design that resulted from all of the underlays shown in the first image at the top of this post. Its for a table saw, or pruning saw. I'm using Vectorworks for the CAD drawing. I found a nice old Disston No. 12 in the basement of my brother-in-law's family home. He thinks it may have belonged to his grandfather. Only half of the tote was there, it was rusted, and it had been sharpened so many times that the plate was nearly gone. You've seen those saws that come to a point at the end like a crazy keyhole saw. (You can see the plate in the top photo, which I used to lay out the holes in the tote design.) So I decided to cut it down and make a short hand saw for breaking down pine boards and other light duty stuff. Once I squared off the cutting edge, and trimmed the toe, the fourth tote hole was too close to the teeth, so I decided to remove it. (You can see the hole drawn in the final design, above. Its just outside the cut line of the new heel design on the plate.)


Here's how it turned out. I wanted a pistol grip for this little saw--I think its about 14 inches long--but I wanted to recall the extra loop in the grip of the Disson No. 12, so I opted for a little remnant. I cut new teeth for crosscut at 7 PPI, so its a little bear when chopping through softwood. The wheat design chip carving and the salvaged saw bolts are also a nod to the saw's history, but I gave up on trying to use a medallion; the cheek design just got too goofy looking when I made it large enough to fit the medallion.


It was a fun little saw to make, and it fits in a tool box, and I can throw it in a bag with the other tools when I'm working around the house and not worry about it getting beat up a little.


* If you think any of these tote designs might be useful for one of your own projects, please feel free to download. If you need a pdf, leave me a comment with your contact and I'm happy to send what you need or see if I can post it.


Saturday, September 30, 2017

Stanley No. 5 Restoration

As my efforts to be greener and all natural in the shop have evolved, I've naturally been more interested in hand tools. You just have to take a quick spin through the handful of posts that precede this one to see that. Hand planes do some things that other tools just can't do, and they do some things better than the alternatives. Even some power tools don't stand up to what can be done with a hand plane. That being said, there are also some limitations that need to be considered. In this post, I'm going to walk you through how I cleaned up an older plane I bought for jointing,* while also touching on what I see as the benefits--and the limitations--of hand planes.


First off, there are lots of different types of hand planes, from general purpose smoothing planes like the Nos. 4 & 5, to specialty planes like routers and rabbet planes, to wooden shaping planes; Stanley alone has over 200 planes in their (historic) catalog. Want to know more, go see Patrick Leach.


The Stanley No. 5, or jack plane, is a general purpose bench plane, but has a long enough bed for jointing in a pinch. The 5 I've fixed up is a cast iron bodied plane with rosewood handles (tote and knob) a heavy steel blade and chip breaker assembly and an adjustable steel frog, fitted with a brass and plastic knob to set the cutting depth and a lateral adjusting lever to adjust the squareness of the blade against the bed of the plane. All of this adjustability hardware means that the cast iron bodied smoothing plane can be tuned and adjusted on the fly without tapping on the cutting iron, wedge or plane body with an adjustment hammer as you would on a simpler wooden version.**

The adjustablity that is built into the Stanley-type bench plane, means that the plane can be broken down to its basic parts. This really helps when it comes to cleaning. Once the plane is broken down, the parts fall into three major groups: The plane body, the rest of the metallic parts, and the wooden knob and tote. The cleaning methods I used on the plane body and the rest of the metallic parts is similar, but the size of the body, and the flatness of the working surfaces, make it a little different than the other parts. The wood parts clearly need a different kind of a attention.

Once its apart, I dust everything off and set the wood parts aside. Next, I take each of the metallic parts to the sink and wash them with scouring powder and really hot water. I know, rust. The hot water brings the temperature of the piece up to a pretty toasty temperature. I wash and rinse them one at a time, and then dry them while they are still hot. I knock or blow the water out of the screw holes and the heat in the metal evaporates off the rest in no time. Take care cleaning the blade, its easy to cut yourself.

Next, I chip off the paint drops--why are there always drips of paint on old tools?--being careful not to damage the Japanning. For this I usually use a sharp piece of hardwood, like maple, rather than a metal tool. After that, I check for rust. Fine surface rust comes off easily enough with some steel wool, or fine sandpaper. For the flat parts of the plane, I'm careful to clean them on a flat surface, coated with sandpaper, to make sure the surfaces stay flat. For bad rust, I drop the parts into some white vinegar overnight, and then its back to sink for more scouring powder and hot water. After the heavy rust is removed, I clean them parts as noted above. A wire brush is handy for hard-to-reach places, but I don't use it on the Japanned areas, or the brass/plastic bits.

The wooden tote and knob usually clean up nice with a little steel wool and some paste wax, but if you've got a broken tote (and it happens, boy) then you've got a more serious problem on your hands. I've done some tote repairs on planes and saws in the past. Getting the original shape right can be the tricky part. Luckily, this plane didn't have any damage to the wooden bits.

Once everything is clean and rust free, I put on a coat of paste wax before I put it back together. A little light oil goes in the screw holes and on the threads of the screws. I pay special attention to the paste wax on the raw metal parts such as the face and the cheeks of the plane, the blade, and chip breaker, and the lever cap, as it really helps to keep the rust at bay.


* I've since picked up a Union No. 7 jointer plane at a yard sale for just a few dollars. It's in pretty bad shape, but I'm going to see if I can tune it up and get it working.
** Stanley (and others) also make wooden planes with metallic inserts (often referred to as transitional planes) that allow a lot of the same adjustability as their metallic counterparts. I'm comparing metallic planes to the traditional wood plane with a wood wedge holding the iron in place against a bed that's carved right into the body of the plane.